by Sherri on March 1, 2007

See #6 below - Jeff Hartnett enjoying the view of Lower Sardine Lake, Northern California.

See #6 below -Â Lower Sardine Lake, Northern California.
When you have a great subject in front of you, shoot it as many ways as possible. If you are traveling and it is a subject you may never be able to shoot again, this is especially important! If the subject is local, then you can return again and again if you make the effort. Here are some things to incorporate into your shooting.
- Try shooting your subject during sunrise and sunset on sunny days.
- Shoot during midday on an overcast day.
- Shoot it in different weather conditions such as the rain, snow or fog.
- Shoot it at night.
- Shoot it in both horizontal and vertical formats.
- Shoot it with and without people.
- Use different lenses such as a wide-angle and a zoom lens.
- Use backlighting (light coming from behind the subject) and sidelighting (light coming from either side of the subject) for added impact.
- Try shooting from different perspectives. Lay on the ground and shoot upward and get on something high and shoot downward.
- Use a fast shutter speed to stop action, then use a slow shutter speed to show motion.
This is a partial list of the things you can incorporate into your shooting and not all of them apply to each subject. Happy shooting!
by Sherri on February 28, 2007
If there is anything you have always wanted to photograph, do it before it’s too late!Â
Some of the oldest buildings in Old Town Auburn, California (USA), caught fire before I ever got them photographed. I guess I just assumed they would always be there and I could photograph them anytime. The Shanghai Bar also located in Old Town Auburn didn’t burn down, but it closed before I could get a good shot of it. The neighbor sold her beautiful Paint horse before I got a good shot of her.
Now, I make a list of the important things in our area that I want to photograph and photograph them sooner rather than later.  You can’t assume they will always be around.Â
This morning, I couldn’t log on to my computer first thing as I usually do. A storm blew in yesterday and dumped 3-4 inches of snow covering our Sattelite Dish. I took the opportunity to go out and photograph our neighborhood, since it’s rare for us to have snow, or at least enough to stick. And who knows when it will happen again? It also gave me something to write about.
Next time you think of something you really want to photograph, do it sooner rather than later, because later may never happen!
by Sherri on February 27, 2007

Sherri and Sierra canoeing on Gold Lake, California.
One great way to add impact to your photographs is by using contrasts. Contrast can make your subject really stand out from the rest of the image. For instance, a bright subject photographed against a dark background, or a dark silhouette against a bright background really adds impact to a photograph.
There are many ways you can implement the use of contrasts in your photographs. I have listed below a few other suggestions for you to try.
Happy/Sad
Male/Female
Large/Small
Hard/Soft
Tall/Short
Young/Old
Static/Motion
Close/Far
Hot/Cold
Rough/Smooth
Living/Dead
by Sherri on February 26, 2007
Auburn, California has recently become “The Endurance Capital of the World,” due to the numerous endurance events that take place here annually. The Western States 100 and The Tevis Cup are two of the events that are attracting thousands of travelers from around the world to Auburn each year.Â
With the increasing popularity of Auburn, there is more demand than ever for stock photos of the area. If your photographic needs include photos of Auburn, visit our Auburn Gallery.Â
Information on how to license images or to order prints can be found here. We will be adding photos to our galleries on a regular basis, so check back often.Â
If you have any questions, please contact us.
by Sherri on February 26, 2007
Instead of going out and shooting anything and everything (photos that is!), why not develop strong collections of the subjects you are passionate about?
This is a really good thing to do if you plan on marketing your images, as well as putting together a slide/digital show of your images for your friends and family. If you don’t currently have any favorite things you like to shoot, or you are not quite sure what “themes” are, here is a very partial list of ideas you can choose from, or you can come up with your own.
- Abstract
- Automobiles
- Boats
- California
- City life
- Emotions
- Humorous
- Pets
- Rural life
- Sports and recreation
Happy shooting!
by Sherri on February 25, 2007
We are really excited to announce that our new blog at sherrimeyer.com is officially up and running.
You may have read our posts on our “tips” blog at smeyer.wordpress.com. We will continue to offer our “free tips” on that site and will be posting what’s new at sherrimeyer.com here.
Some of what you will find on this blog will be news about our services, news about our travels, updates to our Web Site and photos and information about the Auburn, California area.
by Sherri on February 23, 2007
Are you looking for more creative ways to add impact to your photographs? Try framing your subject. The use of framing is not anything new, but if you haven’t tried it by now, I suggest you give it a whirl. There are many ways to do this. Here are a few suggestions to get you going.
- Shoot from inside a tent. You will need a fairly wide angle lens to do this.
- Use a doorway to frame your subject.
- Framing with trees is a very commonly used way of framing.
- Shoot from inside a cave. Again, you will need a wide angle lens.
- Shoot from inside a tunnel.
- You can also use an archway or a car window!
As you start using this technique, you will begin to see more and more ways to implement it. Below are two examples of how I have used framing to add impact to my photographs.
 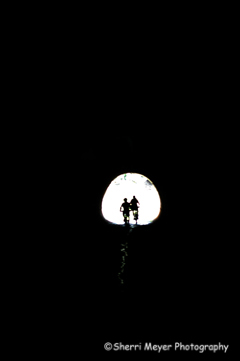
Photo – A tunnel in Auburn, CA (USA)
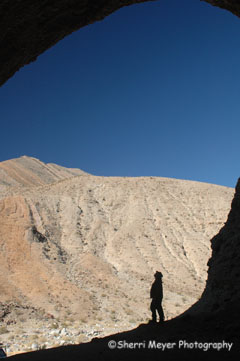
Photo – A cave in Death Valley National Park, CA (USA)
by Sherri on February 20, 2007
There are a couple of hot, new, “must have” books out now on the subject of profiting from your digital photography, by Dan Heller. These books Profitable Photography in Digital Age: Strategies for Success  and How To Make Money with Digital Photography (A Lark Photography Book)
  are chock-full of up-to-date information on developing a successful photography business in the digital age.
Search no more for other books on the subject. These books cover just about everything you need to know, except how to take photographs that sell and how to get rich quick! I highly recommend them for both beginners and seasoned pros who have to keep up with the ever changing industry. Happy reading!
by Sherri on February 20, 2007
Would you like to know how the camera sees a scene before pressing the shutter? Try squinting!
By closing one eye completely and squinting with the other, you will be able to assess the contrast levels in a scene. When we view a subject with our eyes wide-open, we take in all the mid-tones in a scene, as well as the highlights and shadows. By squinting, we are able to see just the highlights and shadows, the way the camera sees it. This tip is especially helpful when shooting during the worst time of the day – midday on a sunny day.Â
The next time you are out on a photo shoot, put this to the test. You will be amazed at how helpful it is. Â
by Sherri on February 19, 2007
Add impact to your photographs by using dramatic lighting. The best lighting occurs during the magic hours around sunrise and sunset on sunny days, midday on overcast days and during the building or clearing of storms. Avoid shooting midday on sunny days whenever possible.