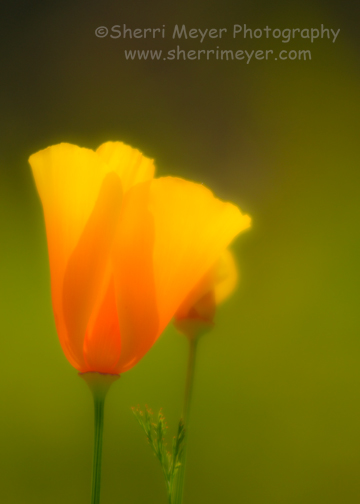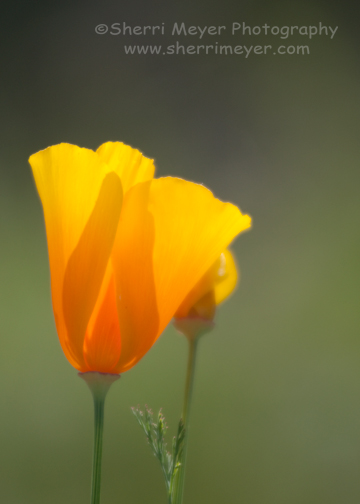
California Poppies growing along the road in my rural Auburn, California neighborhood. This image (and all of our images these days) was processed with Adobe Photoshop Lightroom 2. I set the Vibrance to 82 and the Clarity to -68. I also changed the White Balance to Daylight.
One of the questions I get asked often is “I already have Photoshop, so why do I need Lightroom?” The simple answer to that question is you don’t need it, but you should want it!
It is impossible to include all the ROCKIN features in Lightroom in this post. For now, I’m going to dangle a carrot in front of your eyes, by including a few of MY favorites, in hopes that you will take a bite.
In case you are wondering, I’m not an employee of Adobe, nor do I own any Adobe stocks. I’m just hooked on Lightroom and I hope to get you hooked too!
Photo Management Software
Lightroom is Photo Management Software. It appeals to photographers who need to process large quantities of images. It also offers some editing capabilities. You can literally store and manage thousands of images with it and edit large batches of images at once. Photoshop is designed for photo editing. Graphics professionals who need advanced editing and design tools need Photoshop. It also has its limitations. For instance, you can only edit one photo at a time. They are, however, designed to work together. I use them both, but I do as much as I can in Lightroom!
Non-Destructive Workflow
You heard it right! One of the most important features of Lightroom is the Non-Destructive Workflow. All editing in Lightroom is non-destructive. Original images will never be permanently modified regardless of file type. You can return any time and undo or modify your previous adjustments.
Presets
As most of you probably already know, no matter how good your images are straight out of the camera, they can always be improved upon. Lightroom comes with a few tonal correction presets that you can apply to any of your images. It gets even better. You can also create your own “User Presets,†by combining your favorite combination of settings. I have created a couple of them, which I use for most of my developing. NOTE: Even when you use presets, you will often still need to do a little tweaking here & there.
Create Virtual Copies
Have you ever wished you could see what your original color photo looks like developed a different way? Check this out. In Lightroom, you can create Virtual Copies of your original; as many as you want. Then, you can develop each of them differently for comparison purposes. Virtual Copies are copies made from your original, which don’t take up any additional storage space. You can edit them as if it was an original, but they are not a real file. They are just a set of instructions.
When I am working with an image, I always make a Virtual Copy first. Then, I start applying different presets to it until I find one that excites me. Currently, my preset of choice is one that I created myself and it works well on most of my images. Sometimes I will save more than one Virtual Copy. For instance, I might save one developed with my own preset and one developed using the built in Sepia preset. The opportunities are limitless!
Develop Sliders – Vibrance, Clarity, Fill Light
Vibrance
Want to make your colors more vibrant and give them the “Velvia†look? You can achieve that by using the Vibrance Slider in Lightroom. There is also a Saturation Slider, but I almost never use it. The difference between the two is the Saturation Slider increases all the colors in the image equally, while the Vibrance Slider increases the dull colors the most. See examples above.
Clarity
If you want to add maximum punch to your photos, click and drag the Clarity Slider all the way to the right (+100). This will add midtone contrast to your photos and the midtones will look as if they have been sharpened. To soften or diffuse your photos such as when shooting a portrait, drag the Clarity Slider all the way to the left (-100). This will decrease midtone contrast in your photos. Of course, there are many settings in between 0 & 100 on either side. For examples of this, please check out my posts More Lightroom Fun and Finding a Balance.
Fill Light
You can add fill light to your Backlit photos (if your goal is not a silhouette) with the Fill Light Slider. There are times when you don’t have a flash, or your subject is too far away for a flash to reach. The Fill Light Slider will come to your rescue. Be careful not to add too much, however, or you risk adding unwanted digital noise. I also like to use it to create the look of a painting. Here is an example of when I used the Fill Slider to improve a backlit photo.
Have I convinced you yet?
Originally, I was going to add a few more ROCKIN features of Lightroom to this post. But, I have decided to stop here and save the rest for a future post. Also, don’t forget to read my Top 10 Tweets of the Week posts for more delicious Lightroom tips!
Thank you for visiting and as always comments & questions are welcomed and appreciated! 😉
Have a great weekend everyone!
~Sherri


wonderful tips – love your work!
Hi Lyn! Thank you very much. I love comments like that. Have you purchased Lightroom yet? 😉
Lightroom rocks!
Also, if you are a teacher or have a student in your house, you can purchase Lightroom using an educational discount and save substantial money!