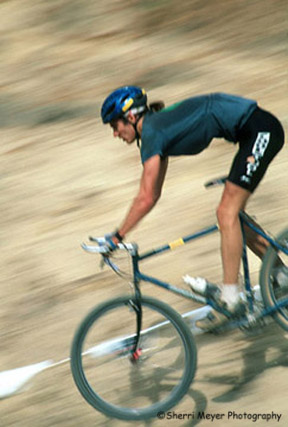
Photo #1 – Mountain Bike Racer, Colfax, California.
There have been a few questions lately on different forums regarding panning photos. So I decided to post my tips for panning success here on my blog.
If you are not sure what panning is, let me explain. Have you ever seen a photo where the subject is in focus and the background is blurred? That is a pan.  Panning is great for showing motion, eliminating unwanted backgrounds and when working in low light.
About a decade ago, I wanted to get proficient at shooting action, so I started photographing mountain bike races. It was during that time that I learned how to pan.
Here are my tips for success.
- In order to achieve good panning results, you need to shoot the subject at or near the speed it is traveling. For instance, if shooting a mountain bike racer traveling at approximately 8 MPH, use a 1/8 sec. shutter speed.
- Subjects moving fairly fast work the best.
- You will need to use a slow film, or the slowest ISO on your digital camera, unless you are working in low light.
- To slow your shutter speed down even more, you can add a polarizer.
- Set your desired shutter speed and determine where you plan to take the photo. Begin tracking your subject well before it reaches that spot. Depress the shutter as the subject passes your predetermined spot and contiunue to follow the subject until it has passed you. If your camera has a continuous shooting mode, take a series each time the subject passes by.
- Although it is recommended that you use a tripod to achieve great results, I rarely use one.
Photo #1 – The mountain biker was traveling at approximately 8 MPH, so I shot him at 1/8 sec. In order to accomplish the results I wanted, I used Fuji Velvia 50 film. There was way too much light that day, so to be able to use that slow of a shutter speed even with the slow ISO 50 film, I had to add a polarizer. I did not use a tripod for this shot.
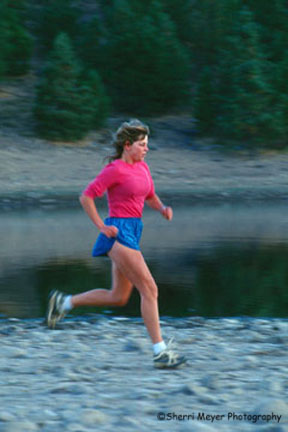
Photo #2 – Donna Bussinger running at Stampede Reservoir, near Truckee, California.
My friend Donna was running at approximately 4 MPH, so I shot this one at 1/4 sec. This was taken early in the morning, so I did not have to add a polarizer. It was shot with either Fuji Velvia 50 or Fuji Provia 100. I did not use a tripod for this shot either.
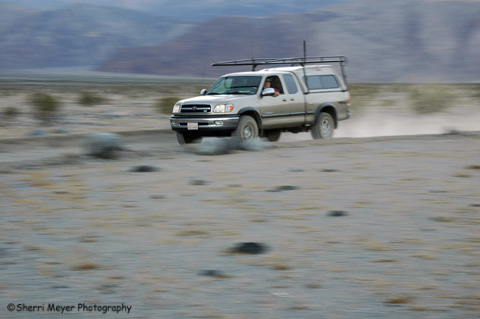
Photo #3 – Jeff Meyer driving the Tundra, near Stovepipe Wells in Death Valley, California.
This shot of my husband Jeff blasting down a dirt road in Death Valley, was taken at at 1/30 sec., as he was traveling at approximately 30 MPH. It was taken with a digital camera set at ISO 200 during the late afternoon, so a polarizer was not needed. Again, no tripod was used.
Great tip Sherri. I enjoyed reading this.
Nice blog Sherri. I will add that the shutter speed you need to create a good blur depends a lot on the focal length of your lens. 1/30 is more than sufficient to do blurs on birds with a telephoto lens. Fill-flash might help that effect as well. Whereas with a wide angle you’d need a lot longer shutter to make a good blur such as the 1/8 you mentioned.
Thanks for your feedback Jim. Stop by again.
Sherri
You are absolutely right Richard! Thank you for adding to my tips. I’m sure there are more things that could be added as well. Feel free anyone to add to the list.
Great tips Sherri!
Thank you Ron!
{ 5 trackbacks }